1. 위젯 css styling
지난번에 사진을 찍고 사진이 갤러리에 저장되는 것까지 프로젝트를 진행하였다. 실제 우리가 만들 기능은 단순한 카메라가 아니라 날짜 등위젯이 화면에 같이 표시되고 사진을 찍으면 위젯 정보가 함께 사진과 저장되는 일종의 타임스탬프이다. 사진이 갤러리에 간헐적으로 늦게 저장되는 현상 해결과 위젯을 캡쳐해 저장하는 것 중 어느 것을 먼저 진행할 지 고민하다 위젯 기능을 먼저 만드는 것이 우선이라고 판단하였다. 그 이유는 현재까지 구현한 기능은 카메라로 사진을 찍는 기능이지만, 실제로는 카메라로 비치는 이미지+ 위젯 이미지가 합쳐진 스크린 상의 이미지를 스크린 캡처하여 갤러리에 저장하는 기능으로 접근하는 것이 더 맞다고 판단했기 때문이다. 그리고 이처럼 사진을 찍는 기능이 아니라 스크린 캡쳐의 경우 갤러리에 저장하는 기능이 잘 작동하는지는 다시 확인해야 할 부분이라 생각했기 때문이다.
아직 구체적인 위젯의 시안이 나온것은 아니라 일단 아래와 같이 만들어주었다.
1) widget 파일 분리
현재 테스트를 진행하고 있는 main.tsx가 다소 복잡한 감이 있어 위젯용 파일을 분리하여 작성하였고 이를 다시 main.tsx에 import해 가져오는 식으로 작업을 진행하였다.
main.tsx
...
 <>
      {device && showCamera && (
        <>
          <Camera
            style={StyleSheet.absoluteFill}
            isActive
            video
            photo
            device={device}
            ref={camera}
          />
          <Widget />
        </>
      )}
...
2) moment 이용
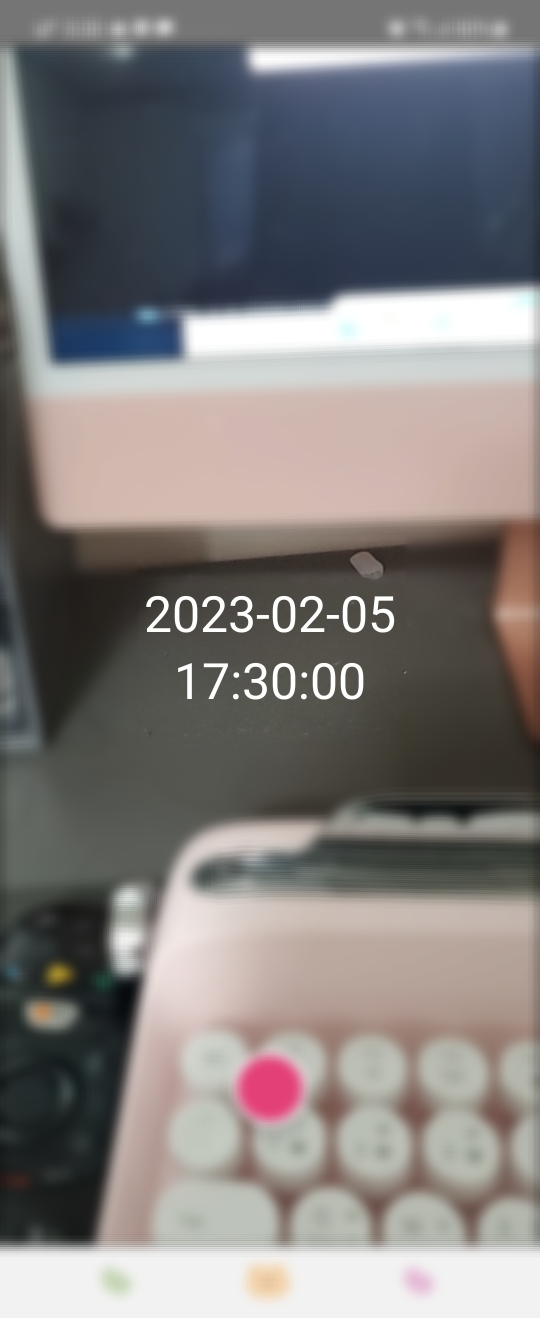
날짜를 쉽게 사용할 수 있는 moment 모듈을 깐 후 날짜와 시간으로 나누어 화면 가운데 올 수 있도록 하였다.
npm install momentwidget.tsx
import React from 'react';
import { ActivityIndicator, StyleSheet, Text, View, TouchableOpacity, Image } from 'react-native';
import moment from 'moment';
function Widget() {
const nowDate = moment().format('YYYY-MM-DD');
const nowTime = moment().format('HH:mm:ss');
return (
<View style={styles.wrapper}>
<Text style={styles.date}>{nowDate}</Text>
<Text style={styles.time}>{nowTime}</Text>
</View>
);
}
const styles = StyleSheet.create({
wrapper: {
width: '100%',
height: '100%',
justifyContent: 'center',
alignItems: 'center',
position: 'absolute',
},
time: {
color: 'white',
fontSize: 30,
elevation: 5,
},
date: {
color: 'white',
fontSize: 30,
elevation: 5,
},
});
export default Widget;
FIX ME: 초가 실시간으로 변경되지 않는다. 후에 setInterval등을 이용해 매초마다 날짜 객체를 새롭게 가져올 수 있도록 처리해줘야 하나 일단 현재는 위젯을 띄우고 스크린캡처 후 올바르게 저장되는지 확인하는 것이 더 중요하기 때문에 일단은 그대로 진행하였다.
2. 스크린캡처 기능 만들기: react-native-view-shot
리액트 네이티브 내에서 스크린 캡처를 하기 위해서는 react-native-view-shot이라는 모듈이 필요했다.
npm install react-native-view-shotimport ViewShot, { captureScreen } from 'react-native-view-shot';
...
const captureRef =useRef()
const getPhotoUri = async (): Promise<string> => {
const uri = await captureRef?.current?.capture();
return uri;
};
const onCapture = async () => {
try {
const uri = await getPhotoUri();
const path = uri.split('file://')[1];
const fileName = uri.split('ReactNative-snapshot-image')[1];
setPhotos([...photos, uri]);
setShowCamera(false);
await RNFS.moveFile(`/${path}`, `${RNFS.PicturesDirectoryPath}/${fileName}`).then(() =>
console.log('Image Moved', `${fileName}`, '-- to --', `${RNFS.PicturesDirectoryPath}`),
);
} catch (e) {
console.log('😻😻😻 snapshot failed', e);
}
};
<ViewShot
ref={captureRef}
style={styles.wrapper}
options={{ format: 'jpg', quality: 0.9 }}
>
<Camera.../>
<Widget/>
</iewShot>
<View style={styles.area}>
<TouchableOpacity style={styles.camButton} onPress={onCapture}></TouchableOpacity>
</View>모듈을 설치한 뒤, 기존의 take photo 함수 대신에 onCapture함수로 바꿔서 달아준 뒤 버튼을 클릭하면 onCapture 함수가 실행되고 캡처된 이미지는 기존의 카메라 폴더가 아닌 Picture 폴더에 저장된다.
3. 위젯이 포함된 이미지 저장하기(길고 긴 삽질의 과정...)

간단히 끝날거라고 생각했지만, 예상외의 복병이 있었다. 분명히 어플을 켜면 카메라가 켜지고, 카메라는 <ViewShot>이라는 태그 안에 감싸져있음에도 불구하고 카메라 샷은 캡처화면에 나오지 않았다. 이 현상과 관련하여 꽤 오랫동안 검색을 했으나, 결론적으로는 react-native-view-shot으로 카메라 샷까지 포함하여 스크린샷을 찍는다는 것은 매우 어렵다는 사실을 알게되었다.

pixel, gl,webView등을 이용하면 방법이 있을수도 있다는 글을 보기는 했지만, 확실히 가능하다는 보장을 할 수 없으며 무엇보다도 내가 이해할 수 있을만한 내용의 코드가 아니었다. 또한 아무리 찾아도 react-native-view-shot 외의 방법으로 스크린 캡처를 하거나 핸드폰 하드웨어에서 스크린샷을 찍는 것과 같이 어플 내부에서 별도로 스크린 샷을 찍는 방법을 찾을 수 없었다.
찾아본 참고자료들 내역
1) can not take screenshot with react native camera on ios
https://github.com/gre/react-native-view-shot/issues/250
Can not take screenshot with react native camera on ios · Issue #250 · gre/react-native-view-shot
How can i take a shot with rncamera on ios, i try on android work perfect, but ios just a black screen when i take a shot. Have any PR to fix it? thanks
github.com
2) react-native-view-shot capturing only camera element content
react-native-view-shot capturing only camera element content
I have this code here: <View style={styles.pageContainer}> <ViewShot ref={viewShotRef} options={{ format: "jpg", quality: 0.9 }}> <Camera style={[ ...
stackoverflow.com
그래도 한가지 확실한 것은 1) 카메라로 사진을 찍는 것(작동) 2)찍은 사진을 화면에 바로 띄우는 것(가능) 3) 이미지+위젯을 스크린캡처하여 내 핸드폰에 저장(가능) 이렇게 분절적으로 동작은 가능하다는 것이었다.
그래서 1) take a photo 함수를 통해 사진을 찍고 갤러리에 저장하지 않는대신 바로 화면에 띄움 2) 화면에 띄워지면 별도의 버튼 누르는 동작없이 바로 onCapture 함수 실행 후 캡처 이미지 갤러리에 저장하는 방법으로 문제를 해결할 수 있지 않을까 생각해보았다.
...

export const Main: FC = () => {
  const { barStyle, backgroundColor } = appStore.useInitTheme();

  const [cameraPermission, setCameraPermission] = useState<CameraPermissionStatus>();
  const [microphonePermission, setMicrophonePermission] = useState<CameraPermissionStatus>();
  const camera = useRef<Camera>(null);
  const devices = useCameraDevices();
  const device = devices.back;
  const [showCamera, setShowCamera] = useState(true);
  const [photos, setPhotos] = useState([]);
  const captureRef = useRef();

  ...
  const onPressButton = async () => {
    if (!camera.current) return;
    const photo = await camera.current.takePhoto({
      flash: 'on',
      qualityPrioritization: 'speed',
    });
    setShowCamera(false);
    setPhotos([...photos, photo]);
    setTimeout(() => {
      onCapture();
    }, 500);
  };

  const getPhotoUri = async (): Promise<string> => {
    const uri = await captureRef?.current?.capture();
    console.log('👂👂 Image saved to', uri);
    return uri;
  };

  const onCapture = async () => {
    try {
      const uri = await getPhotoUri();
      const path = uri.split('file://')[1];
      const fileName = uri.split('ReactNative-snapshot-image')[1];
      await RNFS.moveFile(`/${path}`, `${RNFS.PicturesDirectoryPath}/${fileName}`).then(() =>
        console.log('Image Moved', `${fileName}`, '-- to --', `${RNFS.PicturesDirectoryPath}`),
      );
    } catch (e) {
      console.log('😻😻😻 snapshot failed', e);
    }
  };

  useEffect(() => {
    if (photos && photos.length > 0 && !showCamera) {
      onCapture();
    }
  }, [photos]);

  useEffect(() => {
    requestCameraPermission();
  }, []);

  if (device == null) {
    return <ActivityIndicator size={20} color={'red'} />;
  }

  return (
    <>
      {device && showCamera && (
        <>
          <Camera style={styles.camera} isActive video photo device={device} ref={camera} />
          <Widget />
        </>
      )}
      {showCamera && (
        <View style={styles.area}>
          <TouchableOpacity style={styles.camButton} onPress={onPressButton}></TouchableOpacity>
        </View>
      )}

      {photos && photos.length > 0 && (
        <>
          <ViewShot
            ref={captureRef}
            style={styles.wrapper}
            options={{ format: 'jpg', quality: 0.9 }}
          >
            <View style={{ width: '100%', height: '100%' }}>
              {photos.map((photo, index) => (
                <View key={index}>
                  <Image
                    style={{ width: '100%', height: '100%' }}
                    source={{ uri: 'file://' + photo.path }}
                  />
                  <Widget />
                </View>
              ))}
            </View>
          </ViewShot>
          <View style={styles.area}>
            <TouchableOpacity style={styles.camButton} onPress={onCapture}></TouchableOpacity>
          </View>
        </>
      )}
    </>
  );
};
...\

결과는 절반의 성공이었다. 갤러리에 두개의 사진이 저장되는데 먼저 사진없이 위젯만 있는 경우와 사진과 위젯이 함께 있는 사진이 나중에 저장되었다.
두번 저장이 되는 문제 외에도 setTimeout을 이용해 0.5초 이후에 onCapture 함수가 실행되게 하는것은 정확도 측면에서 매우 위험한 코드이다. 찍은 사진이 화면에 확실히 노출된 이후에 onCapture 함수가 실행될 수 있도록 코드를 수정할 필요가 있다.
또한 시간 위젯의 초 역시 매번 갱신될 수 있도록 setInterval처리를 해주어야 한다.
이번주는 여기까지
'리액트네이티브(ReactNative)' 카테고리의 다른 글
| [카메라 어플](2) : 핸드폰 연결, 사진 찍기, 저장하기, 찍은 사진 렌더링 (0) | 2023.01.29 |
|---|---|
| [카메라어플](1) : 카메라,마이크 접근 권한 받기,카메라 연결 (0) | 2023.01.15 |
| [1강] 배달앱 클론코딩[with React Native] (1) | 2023.01.08 |

